Living Alone During a War: Complete Safety Guide for Women
Living alone during a war is terrifying. This guide gives you a real plan — emergency kits, evacuation steps, home security, and war anxiety coping strategies for solo women.
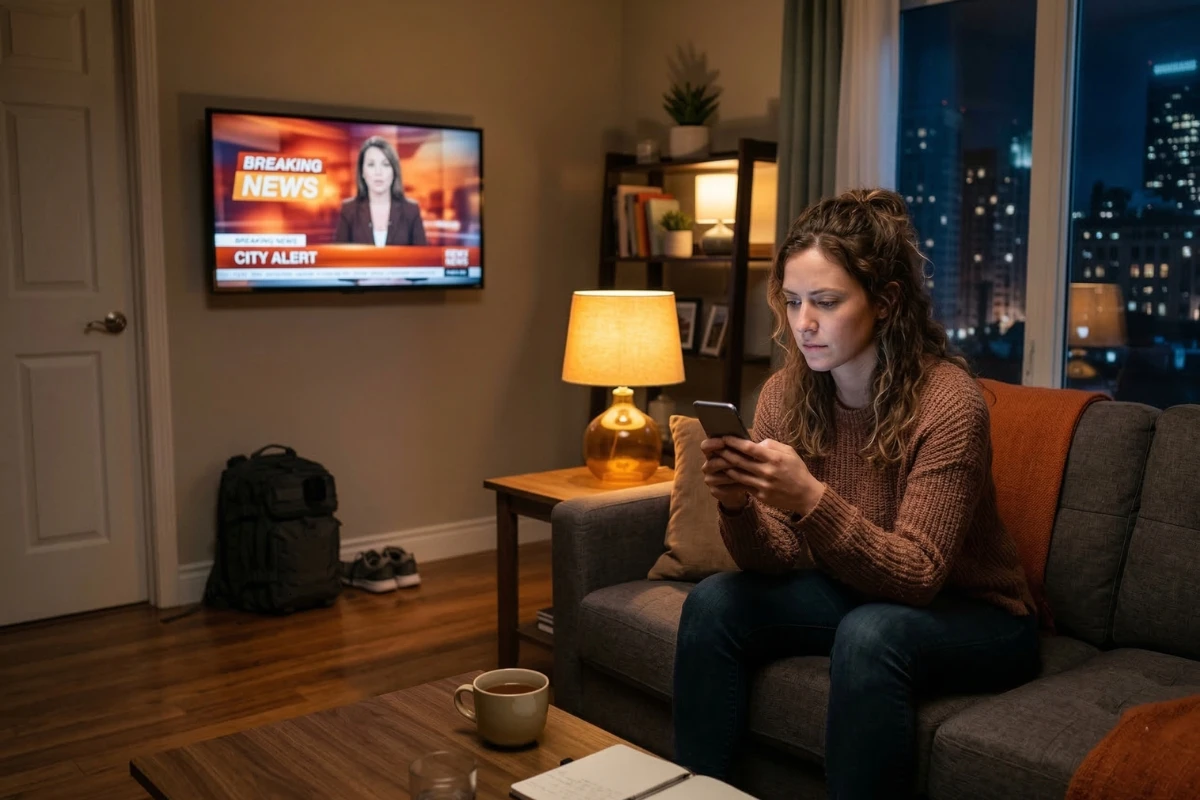
I was sitting cross-legged on my couch last Tuesday night.
Leftover pad thai on the coffee table. Phone in my hand. And I was doom-scrolling through news about Iran and the U.S., reading words like “attack” and “retaliation” and “escalation,” and I felt my chest get tight.
Not because I thought a missile was about to hit my apartment. But because for the first time in a while, I felt the full weight of living alone during something scary.
No one was sitting next to me to say “it’s probably fine.” No one was going to double-check the locks while I checked the news. No one was going to help me figure out what we’d do if things actually got bad.
It was just me, my phone, and a growing knot in my stomach.
If you’re a woman living alone and the news has you spiraling right now, you’re not broken. You’re not dramatic. You’re human. And you’re in the right place.
Then I opened Reddit and saw a post in r/LivingAlone titled “Living Alone in Times of War.” A woman in California wrote that the news had her on edge. That she felt scared and alone. That she didn’t know how to even start making a safety plan. Over 200 people upvoted it. 125 comments poured in.
And the thing that hit me hardest wasn’t the fear in her post. It was how many women in the comments said “same.”
So I did what I always do when something scares me. I turned it into a project.
I spent the next two weeks researching everything I could find on emergency preparedness for people who live alone.
FEMA guidelines. Ready.gov checklists. Red Cross recommendations. Disaster psychology research. CERT training materials. Prepper blogs. Apartment security threads. Mental health resources on war anxiety. Conversations with women who’ve actually navigated real emergencies solo.
And I found something frustrating. Almost every piece of safety and preparedness content out there is written for families. “Hold a family meeting to discuss your plan.” “Designate roles for each family member.” “Make sure your partner knows the evacuation route.”
Cool. Super helpful when it’s just me and a half-dead succulent.
So I wrote the guide I actually needed. The one I couldn’t find anywhere.
This is not a survivalist manual. I am not going to tell you to stockpile ammo or learn to hunt. I am not going to scare you into buying a $3,000 security system. And I am definitely not going to pretend I have all the answers for every possible disaster scenario.
What this guide IS: a calm, practical, step-by-step safety plan built specifically for women who live alone in American cities and suburbs.
Whether you rent a studio apartment or own a house. Whether you’ve lived solo for ten years or just moved out on your own for the first time. Whether you’re worried about war, natural disasters, power outages, or just the general feeling that the world is getting less predictable.
I asked 50 women in my DMs who live alone one question: “Do you have any kind of emergency plan?” 78% said their plan was basically “call my mom.” A few said “pray.” One said “cry and hope for the best.”
I love the honesty. But we can do better than that.
What This Guide Covers
- Your safety network — how to build one from scratch when you don’t have a built-in one
- A real emergency plan — shelter-in-place, evacuation, and communication strategies designed for a solo household
- Emergency kits that actually make sense — three tiers, small apartment friendly, starting at about $85
- Scenario playbooks — exactly what to do, step by step, during a nuclear threat, blackout, civil unrest, natural disaster, or lockdown
- Home security on a renter’s budget — simple upgrades, most under $50
- Digital safety — protecting your information and your location online
- War anxiety and the news spiral — how to stay informed without losing your mind
By the end of this, you’ll have a real plan. Not a fantasy. Not a panic purchase. A plan. One that took me a single weekend to set up and cost about $85 to start.
Let’s get into it.
- Let’s Get One Thing Straight. You’re Not Overreacting.
- Build Your Safety Circle (Because You Don’t Have a Built-In One)
- Your Emergency Plan (The Stuff You Actually Write Down)
- The 3-Tier Kit System (Because One Size Doesn’t Fit Solo Living)
- Set Up Your Alerts (5 Minutes, Then You’re Done)
- What to Do When… (Scenario Playbooks)
- Home Security That Actually Works (Even If You Rent)
- Your Digital Safety Matters Too
- Managing War Anxiety and the News Spiral
- Level Up: Skills That Make You Harder to Rattle
- You’re Not Alone in This
- FAQs
Let’s Get One Thing Straight. You’re Not Overreacting.
There’s a phrase that gets thrown at women a lot. “You’re overreacting.” About work stuff. About relationship stuff. And especially about safety stuff.
So let me say this clearly: if the news has you scared and you live alone, that is a completely rational response.
Psychologists have a name for what a lot of us are feeling right now. It’s called war anxiety.
It’s a documented stress response that happens when you’re constantly exposed to news about conflict, destruction, and potential threats.
It causes intrusive thoughts. Sleep problems. A feeling of helplessness. That thing where you’re lying in bed at 1 am and your brain decides to run through every worst-case scenario it can think of.
It doesn’t mean you’re weak. It means your nervous system is doing its job. It’s scanning for threats because the world is giving it reasons to scan.
But here’s what makes it harder for us. When you live alone, you process fear alone.
There’s no one to turn to in the middle of the night and say “did you hear that?” No one to split the mental load of figuring out what to do. No one to say “okay, I’ll handle the supplies, you handle the plan.” Every piece of the puzzle is yours.
And that can feel overwhelming. I get it. I’ve been there.
But I want to flip that for a second. Because there’s another side to this that nobody talks about.
Women who live alone are actually in a uniquely strong position to prepare.
Think about it. You don’t have to negotiate a plan with a partner who thinks you’re being paranoid. You don’t have to coordinate around kids’ schedules. You don’t have to convince anyone that this matters.
Your plan is your plan. Your timeline is your timeline. You can go from “I should probably do something” to “done” in a single weekend without asking anyone’s permission.
That’s not a weakness. That’s an advantage.
Preparedness is not paranoia. It’s self-care with a purpose. It’s the same instinct that makes you lock your door at night, keep your phone charged, and text a friend when you get home safe from a date. You’re just extending that instinct a little further.
Here’s something that stuck with me from my research.
FEMA’s own data shows that individual citizens and their immediate networks are the first link in the survival chain during any emergency.
Not the government. Not the military. Not first responders who might take hours or days to reach you. You. And whoever you’ve set up around you.
That’s what this guide is about. Not fear. Not worst-case fantasies.
It’s about closing the gap between “I have no idea what I’d do” and “I know exactly what I’d do.” Because once your brain has an answer to the question it keeps asking at 1 am, it can finally settle down.
There’s a real difference between productive preparedness and anxious doom-scrolling. One gives you a plan and then lets you sleep. The other keeps you awake and leaves you with nothing but more fear. We’re going for the first one.
Let’s start building.
Build Your Safety Circle (Because You Don’t Have a Built-In One)
Every emergency guide I read during my research started with “make a family plan” or “sit down with your household.”
And every time I read that, I thought, my household is me and a jar of peanut butter. Thanks.
So we’re going to do this differently.
Before we talk about kits or supplies or scenarios, we’re going to talk about people. Because gear means nothing if nobody knows you need help.
When you live with a partner or a family, you have a built-in safety net.
Someone notices if you don’t come home. Someone helps carry things if you need to evacuate. Someone calls 911 if you collapse in the kitchen.
When you live alone, none of that exists unless you build it on purpose.
That’s what a safety circle is. It’s your hand-built emergency network.
And honestly, putting mine together was the single thing that made me feel the most safe. More than any lock or flashlight or supply kit.
1. Your Inner Circle: Three People, Three Roles
You don’t need a huge network. You need three specific people who each serve a different purpose.
1.1 Your “If Something Happens to Me” Person
This is the most important one.
This person has your spare key. They know what medications you take. They know your pet’s name and your vet’s number. They have access to your emergency documents.
If you end up in a hospital and can’t speak for yourself, this person can walk into your apartment, take care of what needs taking care of, and give doctors the information they need.
Pick someone local. Someone you trust deeply. And then actually give them the information. I know that feels vulnerable. Do it anyway.
1.2 Your Local Friend
This is someone who lives within about 20 minutes of you.
If you need to evacuate and can’t stay in your apartment, you can go to their place. If the power is out for three days and you’re losing your mind alone in the dark, you can crash on their couch.
They don’t need your spare key or your medical records. They just need to be close and willing to open their door.
If you don’t have a friend this close, a trusted coworker or a neighbor you’ve gotten to know can fill this role.
1.3 Your Out-of-State Contact
This one comes straight from FEMA, and it’s smart.
During a major emergency, local phone lines get jammed. Calls within the same area code often can’t connect. But long-distance calls to someone in another state usually go through just fine.
Pick one person who lives far away. A college friend, a sibling in another city, a cousin.
Their job is simple: if things go sideways, everyone in your safety circle checks in with this one person, and that person relays information. They’re your communication hub when local networks are overloaded.
2. Your Neighbor Network
I’m going to be honest. I am not a “knock on doors and introduce myself” kind of person.
I lived in my apartment for eight months before I learned my next-door neighbor’s name. And it was only because we both got locked out on the same day.
But here’s the thing. You don’t need to be friends with your neighbors. You just need one conversation and a phone number exchange.
Here’s the script I used. It felt awkward for about 15 seconds, and then it was done:
“Hey, I’m Elle, I live alone in 4B. I’m trying to be smarter about safety stuff. Would you be okay swapping numbers so we can reach each other if there’s ever an emergency in the building?”
That’s it. Nobody said no. Most people looked relieved that someone brought it up.
What to share: Your name, your unit number, your phone number. That you live alone (yes, tell them. They need to know in case they hear something concerning or don’t see you for days).
What NOT to share: Details about your schedule, when you’re home or away, what valuables you have, your dating life. Keep it safety-focused, not social.
The buddy check-in system. During active crisis periods, my neighbor and I do a simple daily text. Thumbs up emoji means “I’m fine.” No response by a certain time means “come check on me.” Takes two seconds. Costs nothing. Could save your life if you fall, have a medical emergency, or something worse.
3. Your Digital Backup
Your safety circle only works if people can actually access the information they need when things go wrong.
Set up these three things, and then you never have to think about them again.
- ICE contacts on your lock screen. On iPhone, set up your Medical ID through the Health app. On Android, add emergency info through Settings. Paramedics check this. Make sure it’s filled out.
- Shared document with emergency info. I use a shared note in Apple Notes with my “If Something Happens to Me” person. It has my medications, allergies, insurance info, vet info, landlord’s number, and a list of people to contact. Update it once every few months. Takes five minutes.
- Location sharing with 1-2 trusted people. Turn on continuous location sharing with your inner circle person and your local friend. On iPhone it’s through Find My. On Android it’s through Google Maps. It runs in the background, costs you nothing, and means someone always knows where you are without you having to text.
4. One More Thing: Proximity Matters More Than Relationships
You might have a wonderful, supportive family that would do anything for you.
But if they live 800 miles away, they cannot help you during the first 72 hours of an emergency. They can’t bring you water. They can’t check on you during a blackout. They can’t drive you out of the city.
Build your safety circle based on who is close, not just who you love. Your mom in Ohio is your out-of-state contact. Your actual boots-on-the-ground circle needs to be local.
Even if you have family nearby, even if you have a partner you see often but don’t live with, if no one is inside your apartment with you at 2 am when the power goes out, you are functionally solo. Plan like it.
Your Emergency Plan (The Stuff You Actually Write Down)
I used to think I had a plan. My plan was: figure it out when it happens. Improvise. I’m smart. I’ll be fine.
Then I read something that changed my mind completely.
During an actual emergency, adrenaline floods your brain and shuts down the part responsible for complex decision-making. You literally become dumber in a crisis.
Not because you’re not capable. Because that’s how human biology works. Your body prioritizes “run or fight” over “think carefully about the best course of action.”
A written plan means you don’t have to think. You just follow the steps.
It’s the difference between standing in your apartment frozen, wondering what to do, and grabbing a piece of paper that tells you exactly what to do.
I wrote mine on a Sunday afternoon.
It took about two hours. I printed it, put one copy in my go bag, taped one inside my kitchen cabinet, and shared a digital version with my safety circle.
That’s it. Done. And I have not worried about “what would I do if…” nearly as much since.
Your plan has four parts.
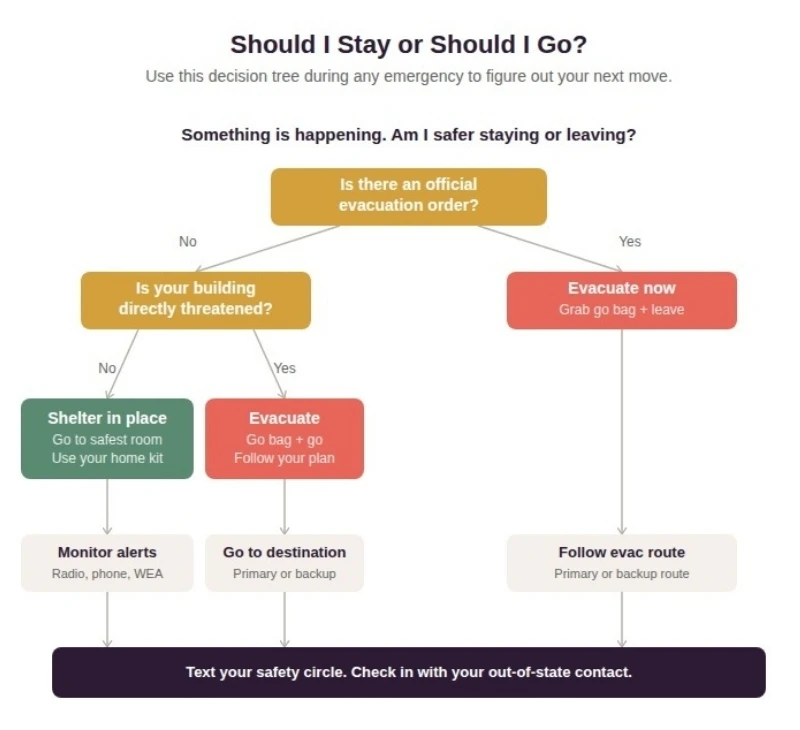
Part 1: Your Shelter-in-Place Plan
Sheltering in place means staying inside your home because going outside is more dangerous than staying in. This could happen during a nuclear or chemical threat, a severe storm, an active threat in your area, or heavy civil unrest nearby.
Step one is knowing your safest room. This depends on the scenario.
- Nuclear or chemical threat: Interior room with no windows, or as few as possible. A bathroom or walk-in closet works. You want as many walls as possible between you and the outside. If you’re in an apartment building, lower floors and center units are better shielded than top floors and corner units.
- Tornado: Same idea. Interior room, lowest floor, away from windows. Bathroom is ideal because the plumbing in the walls adds structural reinforcement.
- Civil unrest or gunfire nearby: Stay away from windows, especially on lower floors. Move to an interior room or the side of your apartment that faces away from the street.
Step two is knowing how to seal a room if you need to. This sounds extreme, but it’s actually simple.
If authorities say to shelter from airborne contaminants (chemical spill, fallout), you close all windows and doors, turn off ventilation systems, and use plastic sheeting and duct tape to cover window frames and vents.
You probably won’t ever need to do this. But having a roll of plastic sheeting and a roll of duct tape under your sink means you could if you had to.
Step three is sanitation. Nobody talks about this, but if the water stops running and you’re sheltering for 24+ hours, you still need to use the bathroom.
The simplest solution: a 5-gallon bucket, heavy-duty trash bags to line it, and cat litter or sawdust to absorb waste and control odor.
Seal each bag and store it away from your living area. Not glamorous. But functional.
How long might you shelter? It depends.
For nuclear fallout, guidance says at least 24 hours and up to 72 hours.
For severe weather, usually a few hours. For civil unrest, it varies.
The key is: don’t leave until official sources say it’s safe. Which brings us to your alerts, but we’ll cover that in a later section.
Part 2: Your Evacuation Plan
Evacuation means leaving your home because staying is more dangerous than going. Wildfires. Flooding. A direct threat to your building or neighborhood. Or, in a worst-case scenario, an order to leave your area.
The number one thing solo women get wrong about evacuation: not having a destination. “I’ll just leave” is not a plan.
Leave to where? With what route? How are you getting there?
Write down these specifics now, while you’re calm and have time to think:
- Primary destination: Your local friend’s place, a family member’s home, a specific shelter. Know the address. Know how to get there without GPS (in case your phone dies or cell service is down).
- Backup destination: In case your first option is inaccessible. Pick somewhere in a different direction from your primary.
- Primary route and backup route: If your main road is blocked, flooded, or gridlocked, what’s the alternate? Drive it once so it’s not unfamiliar.
- If you don’t have a car: This is a big one for solo women in cities. Identify your options now. A neighbor who’s agreed to give you a ride. Saved ride-share contacts. Public transit routes that would be running during an evacuation. A bike route if you have one. Walking routes to the nearest shelter. Don’t wait until the moment arrives to figure this out.
The “grab and go” sequence. When it’s time to leave, you should be out the door in 90 seconds or less. That means knowing exactly what you’re taking and in what order:
- Go bag (already packed, by the door)
- Phone and charger (grab from wherever it is)
- Keys and wallet
- Pet and pet supplies (if applicable)
- Jacket and sturdy shoes (even if you’re in pajamas, swap into real shoes)
That’s it. Everything else either doesn’t matter or is already in your go bag.
Practice this once. Time yourself.
I did it in my apartment, and it took 87 seconds the first time, about 60 seconds after I moved my go bag closer to the door.
Part 3: Your Communication Plan
During a major emergency, cell networks get overwhelmed. Calls don’t connect. Apps crash. Group chats stop loading.
This is normal and temporary, but it’s terrifying when you’re alone and can’t reach anyone.
Plan for it now so it doesn’t catch you off guard.
Your contact sequence. Write down exactly who you’re contacting and in what order:
- First text: Your “If Something Happens to Me” person. Pre-write the message now and save it as a note on your phone. Something like: “I’m safe. I’m at [home/work/other]. Power is [on/off]. I’ll check in again in [X hours]. If you don’t hear from me by [time], call [backup person].”
- Second text: Your out-of-state contact. Let them know you’re okay so they can relay to others.
- Third text: Anyone else who would worry. Parents, close friends, your boss if it’s a workday.
Why text, not call: SMS messages use far less bandwidth than voice calls. When networks are congested, texts will often get through when calls won’t. Send short texts. Avoid photos or videos until networks stabilize.
If your phone dies or networks go down completely: This is why you have a battery-powered radio in your kit.
NOAA Weather Radio broadcasts official emergency information continuously. It doesn’t need cell service or internet. It just works.
Social media as a backup. Facebook has a Safety Check feature during major events. Instagram and X let you post a quick status.
If you can get online, a single post saying “I’m okay” can reach dozens of people at once and save you from fielding individual messages.
Part 4: Your Document Kit
If you had to leave your apartment in 90 seconds and couldn’t come back for weeks, would you have everything you need to prove who you are, access your money, get medical care, and file insurance claims?
Most people don’t. Solo women especially, because there’s no one else keeping a backup copy.
Make copies of these documents and keep them in a waterproof bag inside your go bag:
- Government-issued ID (driver’s license or state ID)
- Passport
- Lease or mortgage documents
- Health insurance card and policy number
- Car insurance and registration (if applicable)
- Prescriptions list with dosages and pharmacy info
- Bank and credit card account numbers (not PINs, just enough to access your accounts)
- Emergency contact list (printed, because your phone might be dead)
- Pet vaccination records (if applicable)
Also store digital copies. Scan or photograph everything and save it in an encrypted cloud folder. iCloud, Google Drive, or Dropbox all work. Share access with your “If Something Happens to Me” person.
One thing specific to solo women: legal documents. If you’re incapacitated and have no spouse, who makes medical decisions for you? Who handles your finances? Without the right paperwork, the answer might be “no one” or “a court-appointed stranger.”
Consider setting up:
- Healthcare proxy / medical power of attorney — designates someone to make medical decisions if you can’t
- Financial power of attorney — designates someone to handle bills, rent, and accounts if you’re unable to
- A basic will — especially if you have pets, property, or specific wishes
These sound heavy. But you can set up basic versions through online legal services for under $100. And once they’re done, they’re done. File them with your document kit and tell your inner circle where they are.
The 3-Tier Kit System (Because One Size Doesn’t Fit Solo Living)
Here’s where most emergency guides lose people. They hit you with a 47-item checklist, half of it sounds like you’re prepping for the apocalypse, and you close the tab because it feels like too much.
I get it. I did the same thing three times before I finally built my kit.
The problem is that those lists treat emergency supplies as one giant thing.
But your needs are completely different depending on whether you’re out running errands when something happens, whether you need to grab a bag and leave your apartment in 90 seconds, or whether you’re hunkering down at home for a week.
So instead of one overwhelming list, I use a three-tier system. Each tier is its own kit with its own purpose.
You can build Tier 1 today for about $20. Tier 2 in a weekend for about $85. Tier 3 over the next few months as your budget allows.
No pressure. No panic buying. Just steady, smart preparation.
Tier 1: The Micro Kit (Lives in Your Everyday Bag)
This is the one most people skip entirely.
But think about it. You might not be home when something happens. You could be at work, on the subway, at a coffee shop, at the grocery store. If an emergency hits and you can’t get home for hours, what do you have on you right now?
The micro kit fixes that. It’s small enough to live permanently in your purse, tote, or backpack. You pack it once and forget about it until you need it.
What goes in it:
- Portable phone charger (charged, check it monthly)
- $40-60 in cash, small bills (fives and ones; ATMs and card readers go down during outages)
- Mini flashlight or keychain light
- Laminated emergency contact card (your safety circle names, numbers, and one line of medical info like allergies or blood type)
- One day of any critical medication you take
- Whistle or personal alarm
- A few energy bars or individually wrapped snacks
Total cost: about $20-30, most of which is the portable charger.
Total weight: barely noticeable.
But the difference between having this and not having it during an unexpected emergency is enormous.
Tier 2: The Go Bag (By Your Front Door, Out the Door in 90 Seconds)
This is the big one.
Your go bag is a packed backpack that sits by your front door or in your coat closet, ready to grab if you need to evacuate.
Everything in it should keep you functional for about 72 hours without access to your home, stores, or reliable services.
I used a regular black backpack I already had. Nothing tactical looking. Nothing that screams “I’m a prepper.” Just a normal backpack that happens to have everything I need inside it.
The essentials:
- Water: 3 days’ worth is technically 3 gallons, which is heavy. I carry two 32-ounce bottles and a small pack of water purification tablets as a backup. The tablets weigh nothing and can purify water from almost any source.
- Food: 3 days of non-perishable, no-cook food. Energy bars, peanut butter packets, dried fruit, trail mix, crackers. Nothing that needs a can opener or a stove.
- Light: Flashlight with extra batteries. I keep a small LED headlamp too because it frees up your hands.
- Information: Battery-powered or hand-crank NOAA Weather Radio. This is non-negotiable. When your phone dies, and the internet is down, this is how you hear official emergency updates.
- First aid: A basic first aid kit. Bandages, antiseptic wipes, pain relievers, any personal medications.
- Documents: Copies of everything from your document kit (Section 3), in a waterproof zip-lock bag.
- Cash: $200 or more in small bills. Fives, tens, twenties. When the power is out, cash is the only thing that works.
- Tools: Multi-tool or Swiss army knife. Whistle. Pen and small notebook.
- Protection: 2-3 N95 masks. Useful for smoke, dust, chemical events, or just general air quality emergencies.
- Comfort: A small book, a deck of cards, or a journal. Sounds silly until you’re sitting in a shelter for 12 hours with nothing to do and a brain that wants to spiral.
Now here’s the part every other guide skips. The stuff women actually need:
- Menstrual products. Your period does not care about the emergency. I keep a menstrual cup in my go bag because it’s reusable, compact, and lasts years. If cups aren’t your thing, pack tampons or pads for at least one full cycle. A few pairs of period underwear work too.
- Extra underwear. Three pairs minimum. And a sports bra. These are small, weigh nothing, and matter more than you think after 48 hours in the same clothes.
- One change of clothes. Leggings or joggers, a t-shirt, a pair of socks. Roll them tight. They’ll fit.
- Hair ties. Four or five. Tiny. And you will want them desperately if you don’t have them.
- Backup birth control or reproductive health items. If you’re on the pill, keep a backup week’s supply in your bag. If you use other methods, think about what you’d need access to and plan accordingly.
- Compact self-defense tool. Where legal in your area, a small pepper spray or personal safety alarm. Check your state and local laws before carrying pepper spray. A personal alarm that emits a loud screech when activated is legal everywhere and can draw attention fast.
My go bag weighs 11 pounds. I timed my grab-and-go sequence. From couch to front door, bag on shoulder, keys in hand: 87 seconds the first time. About 60 seconds now that I’ve done it a few times.
Tier 3: The Home Kit (For Sheltering in Place, 7+ Days)
If you’re sheltering at home during a prolonged crisis, your go bag is the foundation. The home kit is everything else you need to stay safe and functional for a week or more without leaving.
This is the tier you build gradually. Don’t try to do it all at once. Add a few things each time you go to the store.
Water and food:
- Water: The standard is one gallon per person per day. For 7 days, that’s 7 gallons. Store them in a cool, dark spot. Under the bed works. Replace every 6 months.
- Food: 7-day supply of shelf-stable food. Canned goods (beans, soup, tuna, vegetables), rice, pasta, oatmeal, peanut butter, crackers. And a manual can opener. Please do not forget the can opener. I almost did.
- Water for sanitation: Fill your bathtub if you get advance warning that water service might be disrupted. That water isn’t for drinking. It’s for flushing the toilet.
Shelter-in-place supplies:
- Plastic sheeting and duct tape (for sealing windows/vents if needed)
- Heavy-duty trash bags (sanitation, waste, waterproofing)
- Extra blankets or a sleeping bag
- Fire extinguisher (small, residential-grade)
- Bleach, unscented (8 drops per gallon purifies water in an emergency. Only use regular, unscented bleach.)
Staying sane:
- Books, puzzles, journals, coloring books, a deck of cards
- A full charge on every portable battery you own
- Downloaded movies, podcasts, or music on your phone (you can’t stream without internet)
I know that last category sounds like a luxury. It’s not. Research on disaster psychology shows that boredom and isolation are serious mental health risks during extended sheltering. Entertainment isn’t frivolous. It’s a coping tool.
The Budget Reality
I know what you might be thinking. This is a lot of stuff. I can’t afford all this right now.
You don’t have to. Here’s how I did it:
- Week 1: Built my micro kit with stuff I mostly already had. Bought a portable charger ($15) and a pack of energy bars ($6). Total: about $20.
- Week 2: Bought a basic first aid kit ($12), flashlight ($8), water purification tablets ($9), and started collecting food items I already bought regularly. Total: about $30.
- Week 3: Added the NOAA radio ($25), extra batteries ($8), cash withdrawal ($200, but that’s not a “cost” since it’s your own money), and a few hygiene and comfort items. Total: about $35.
- Months 2-3: Gradually stocked the home kit. A case of water here, extra canned goods there, a fire extinguisher during a hardware store run.
Starter go bag cost: about $85. Full three-tier system over 3 months: roughly $150-200, not counting the cash reserve which is still yours.
Storage in a Small Apartment
You don’t need a garage or a basement. I live in a one-bedroom apartment, and everything fits.
- Micro kit: Lives in my everyday bag. Takes zero extra space.
- Go bag: Back of my coat closet, on the floor by the door. Looks like a regular backpack.
- Home kit water: Under my bed. Seven gallon jugs fit perfectly.
- Home kit food and supplies: One dedicated shelf in my kitchen pantry. That’s it.
Nobody who walks into my apartment would know I’m prepared. And that’s exactly the point.
Free Printable
Emergency Kit Checklist: The 3-Tier System
Print it. Take it to the store. Check things off as you go.
Micro kit, go bag, and home kit — all on two pages.
No email required. Just click and save.
Set Up Your Alerts (5 Minutes, Then You’re Done)
This is the shortest section in this guide because it’s the simplest.
Five minutes of setup now means you’ll actually hear about emergencies when they happen instead of finding out from a panicked group chat twenty minutes too late.
Here’s what to set up. Do it right now while you’re thinking about it.
1. Wireless Emergency Alerts (WEA)
These are the loud, jarring alerts that take over your phone screen during extreme weather, AMBER alerts, or national security threats.
They come directly from FEMA and the National Weather Service through your cell carrier. No app needed. No sign-up required. They just show up.
But they can be accidentally turned off. Check yours now.
On iPhone: Settings > Notifications > scroll all the way to the bottom. You’ll see toggles for Government Alerts, Emergency Alerts, and Public Safety Alerts. Make sure all three are on.
On Android: Settings > Notifications > Wireless Emergency Alerts (or Advanced Settings > Emergency Alerts, depending on your phone). Same idea. Make sure everything is enabled.
Takes 30 seconds. Do it now. I’ll wait.
2. Your Local Alert System
WEA covers big national-level stuff. But your city or county almost certainly has its own emergency notification system for local events like chemical spills, water main breaks, road closures, or localized evacuations.
How to find yours: Google “[your city or county name] emergency alerts” or “[your county] emergency notification sign-up.” Most use a system like Nixle, AlertMedia, Everbridge, or CodeRED. You’ll enter your address, phone number, and email, and choose what types of alerts you want.
Sign up for your home address and your work address if they’re in different areas.
3. The FEMA App
Free. Available on iPhone and Android.
Download it, set your location, and it will send you push notifications for severe weather alerts and emergency declarations in your area. It also has a built-in checklist tool, shelter locator, and disaster resource finder.
Search “FEMA” in your app store. Download. Set location. Done.
4. NOAA Weather Radio
We talked about this in the kit section, but it deserves its own mention here.
A battery-powered or hand-crank NOAA Weather Radio receives continuous broadcasts from the National Weather Service.
It works when your phone is dead, when the internet is down, and when the power is out.
It’s the last line of communication between you and official emergency information. It costs about $25, and it might be the most important item in your entire kit.
5. Your Information Diet
This one isn’t about an app or a setting. It’s about a habit.
During a crisis, your instinct will be to refresh the news constantly. Check Twitter every three minutes. Watch cable news for hours. Read every Reddit thread. I know because I’ve done it. And every single time it made me feel worse, not better.
Set this rule for yourself now, before you need it:
- Pick 2-3 trusted sources. Your local emergency management social media account, the National Weather Service, and one credible national news outlet. That’s it.
- Check twice a day. Morning and early evening. 15 minutes each time.
- No news in bed. Not before sleep. Not when you wake up at 3am. If something truly urgent happens, your WEA alert will wake you up. That’s what it’s for.
Everything else is noise that feeds anxiety without giving you anything actionable. We’ll go deeper on this in the war anxiety section later. But for now, decide on your 2-3 sources and mentally commit to the twice-a-day rule.
You’ve now got your safety circle, your written plan, your kits, and your alert systems in place. The foundation is built. Next, we’re going to walk through exactly what to do when specific emergencies actually happen.
What to Do When… (Scenario Playbooks)
You’ve got your safety circle, your written plan, your kits, and your alerts set up. The foundation is solid.
Now let’s talk about what you actually do when something happens.
Each scenario below gives you a clear, step-by-step sequence. These aren’t hypotheticals. They’re based on official guidance from FEMA, the Red Cross, and emergency management professionals, translated into plain language for someone who is alone in an apartment at the moment things go wrong.
You don’t need to memorize these. Bookmark this page. Print the ones relevant to your area. Stick them inside the kitchen cabinet next to your emergency plan.
The point is to have them when you need them.
Scenario Quick Reference
Bookmark this. Tape it inside your kitchen cabinet. One glance = you know what to do.
If There’s a Missile or Nuclear Threat Alert
This is the scenario that scares people the most, and honestly, it scared me the most while writing this guide.
But here’s something that helped me: there are clear, simple steps based on decades of research, and following them dramatically increases your safety.
This isn’t “hope for the best.” This is physics and biology working in your favor if you act fast.
The three-word rule from every official source: Get inside. Stay inside. Stay tuned.
In the first few minutes:
- Get inside the nearest large, sturdy building immediately. Not your car. Not a bus shelter. Not a mobile home. You want concrete, brick, or thick walls. A large apartment building, an office building, a parking garage, a subway station. The more material between you and the outside, the better.
- Go to the center of the building or the basement. Away from windows and exterior walls. If you’re in a multi-story building, the middle floors are better than the top or bottom. If there’s a basement, go there.
- If you were outside, remove your outer layer of clothing before you enter your shelter space. Bag it or leave it near the entrance. This removes a significant amount of radioactive dust. Wash any exposed skin with soap and water if available.
Once you’re sheltered:
- Stay inside for at least 24 hours unless authorities give you other instructions. Fallout radiation drops rapidly. After 24 hours, the danger is significantly reduced. After 48 hours, even more.
- Close and lock all windows and doors. Turn off fans, air conditioning, and heating systems that pull air from outside.
- Monitor your battery-powered radio or phone for official updates. Don’t rely on social media rumors. Listen for instructions from your local emergency management agency.
- Drink your stored water. Don’t use tap water until authorities confirm it’s safe.
The context-specific version:
- If you’re at home: You already know your safest interior room from your shelter-in-place plan. Go there. Grab your home kit supplies. Seal the room if instructed.
- If you’re commuting: Get off the street immediately. The nearest large building is your shelter. Subway stations are excellent shelters. Don’t try to drive home if the alert is active.
- If you’re at work: Stay in the building. Move to an interior room or basement. Don’t try to leave to get home. Your workplace is likely a better shelter than your commute.
Something important: After a nuclear detonation, you typically have about 10 to 15 minutes or more before dangerous fallout begins arriving, depending on distance. That is enough time to get inside a real building. The worst thing you can do is panic and stay in the open or sit in traffic trying to drive somewhere.
Do this now, not during a crisis: Walk your neighborhood mentally or physically. Identify 2-3 large concrete or brick buildings between your home, your workplace, and your regular commute spots that could serve as shelters. Know where the subway entrances are. Know which buildings have basements. This takes ten minutes and it means you won’t have to think about it when you’re terrified.
If the Power Goes Out and Doesn’t Come Back
A blackout could last hours, days, or in extreme cases, weeks. The cause might be a storm, a grid failure, a cyberattack, or extreme heat overloading the system.
Regardless of why it happened, the playbook is the same.
First 30 minutes:
- Assess the scope. Is it just your building? Your block? Your whole city? Look outside. Check your phone if you still have service. This tells you whether it’s a minor inconvenience or something bigger.
- If you still have power or partial power: Charge every device you own immediately. Phone first, then power banks, then laptop.
- Fill your bathtub with water before water pressure drops. This water is for flushing your toilet, not for drinking. You have stored drinking water in your home kit.
First 24 hours:
- Use flashlights and LED lanterns, not candles. This matters more when you live alone. If a candle tips over while you’re asleep, there’s no one else to notice. Flashlights are safer. Period.
- Keep your fridge and freezer closed. A closed refrigerator stays cold enough to keep food safe for about 4 hours. A closed, full freezer holds its temperature for about 48 hours (24 hours if half full). Every time you open the door, you lose cold air.
- Eat perishable food first. Use up what’s in the fridge before it spoils. Then switch to your non-perishable supply.
- Conserve your phone battery ruthlessly. Turn off Bluetooth, Wi-Fi, and background app refresh. Lower your screen brightness. Switch to Low Power Mode. Your phone is your lifeline for communication and information. Treat the battery like gold.
Days 2 and beyond:
- Check on your neighbors. Especially older residents or anyone you know who lives alone. This is your safety circle working in both directions.
- Stay inside after dark if possible. Extended blackouts can bring increased opportunistic crime, especially in urban areas. Use your door security bar. Keep your flashlight accessible.
- Manage your food and water supply. Switch to non-perishables. Track what you’re consuming so you know how many days of supply you have left.
Apartment-specific problems nobody warns you about:
- Electric door locks and building gates may stop working. This means your building’s security system is down. Prop nothing open. Be aware that anyone could potentially enter.
- Elevators will be out. If you live on a high floor, plan for stair trips being your only option. Limit them.
- If you have an electric stove, you cannot cook. This is why your kit includes food that requires zero preparation. Energy bars, peanut butter, crackers, canned goods that can be eaten cold.
If There’s Civil Unrest or Protests Near Your Area
Protests are a normal part of a functioning democracy. Most are entirely peaceful. But when unrest escalates near your neighborhood, the calculus changes when you live alone.
The basic rule: Stay informed. Stay home. Stay quiet.
- Don’t go out to watch or take photos unless you’re intentionally participating and have made a safety plan for that specifically.
- If you live on a lower floor, stay away from street-facing windows. Close your blinds or curtains. Not because you’re hiding, but because stray projectiles, tear gas, or broken glass are real possibilities during escalation.
- Keep your go bag accessible, but don’t evacuate unless there’s a direct and immediate threat to your building. Leaving your secured apartment to walk through an active unrest situation is almost always more dangerous than staying put.
- Lock your doors. Use your security bar. Don’t open the door for strangers, even if they say they need help. You can offer to call 911 for them through the closed door.
If you absolutely must travel during unrest:
- Stick to main roads away from gathering points
- Tell someone in your safety circle your exact route and check-in times
- Keep your phone charged, but disable location services on social media
- Don’t wear anything that could be mistaken for affiliation with any group
- Keep your head up, move with purpose, and avoid engaging with anyone
A digital safety note: During periods of unrest, be very careful about posting your location, your apartment’s street view, or details about being alone. Tensions run high, and people do strange things. More on digital safety in the next section.
If a Natural Disaster Hits
Natural disasters vary wildly by type and region, and there are excellent in-depth guides for each specific one.
I’m not going to rewrite those here. What I am going to do is highlight the things that are different when you experience a natural disaster alone.
The biggest difference: You are your own early warning system.
Nobody is going to shake you awake at 3am and say “there’s a tornado warning.” Nobody is going to say “we need to leave now, the fire is getting close.”
Your phone alerts (which you set up in Section 5) and your NOAA radio are your wake-up call.
Make sure your phone’s alert volume is turned up and not on silent when you sleep.
Quick reference by disaster type:
- Earthquake: Drop, cover, hold on. Get under sturdy furniture or against an interior wall away from windows. Once the shaking stops, check yourself for injuries. Put on shoes (broken glass). Check your apartment for gas leaks or structural damage. If the building feels unsafe, grab your go bag and get out.
- Hurricane: You’ll have days of advance warning. Decide early: evacuate or shelter. If you shelter, follow your shelter-in-place plan. Fill the bathtub. Charge everything. Move to an interior room during the worst of it. If you evacuate, go early. Don’t wait for the last minute.
- Tornado: Move to your safe room immediately when the warning hits. Bring your phone, shoes, and a pillow or blanket to cover your head. Stay there until the warning expires.
- Wildfire: If you can see smoke or smell fire and you haven’t received an evacuation order yet, start preparing to leave anyway. Load your car or arrange a ride. Don’t wait for the official order if conditions are deteriorating visibly.
After any natural disaster: Check in with your safety circle immediately. Assess your home for damage before moving around freely. Wear sturdy shoes. Don’t use candles if there might be gas leaks. And take photos of any damage for insurance purposes.
If There’s a Pandemic or Extended Lockdown
We’ve all been through this one. And for women who lived alone during COVID, the lessons were hard-won. This scenario isn’t hypothetical. It’s memory.
The practical stuff:
- Stock 2-3 weeks of supplies minimum, not just 72 hours. A pandemic isn’t a weekend event.
- Prescription refills: Get them before things get bad. Don’t wait until your last pill to try refilling during a crisis.
- Thermometer, pulse oximeter, and basic OTC medications (fever reducer, cough suppressant, electrolyte packets) in your home kit. Know your own baseline health numbers so you can recognize when something is off.
The real challenge: your mental health.
Sheltering alone during a weeks-long lockdown is one of the hardest things a solo-living woman can face. Not because of the virus or the logistics, but because of the isolation.
What helped me and what the research supports:
- Build a daily structure. Wake up at the same time. Eat meals at the same time. Have a morning routine and an evening routine. Structure is the antidote to spiral.
- Daily check-ins with your safety circle. Not just a thumbs-up text. An actual conversation. Voice or video. Every single day.
- Move your body. Even if it’s 20 minutes of stretching in your living room. Physical movement is the single most effective non-medical intervention for anxiety and depression.
- Set a “done” time each day. A time after which you stop consuming news, stop working, and stop being productive. Read a book. Watch something dumb. Let your brain rest.
When to seek medical help alone: This is the part that genuinely scared me during COVID. How sick is “go to the hospital” sick when there’s no one here to help you decide?
Know your thresholds. For respiratory illness: persistent fever above 103°F, difficulty breathing that doesn’t improve with rest, confusion or inability to stay awake, bluish lips or face. If you hit any of those, call 911. Don’t try to drive yourself.
And make sure your “If Something Happens to Me” person knows your medical history so they can advocate for you if needed.
Home Security That Actually Works (Even If You Rent)
Everything we’ve covered so far is about preparing for major emergencies. But the truth is, most of the time the thing that makes a solo woman feel unsafe isn’t a missile or a blackout.
It’s the weird sound at 2am. The stranger who lingers near your building entrance. The delivery guy who asks one too many questions.
Everyday security is the foundation that everything else sits on. If you don’t feel safe in your home on a regular Tuesday night, you’re not going to have the bandwidth to think about emergency preparedness.
Good news: you don’t need a lot of money or a landlord’s permission to make your space significantly safer.
Quick Wins: Under $50, Renter-Friendly, No Drilling
These are the upgrades that give you the most security per dollar. If you do nothing else from this section, do the first one.
Door security bar or door jammer ($15-25). This is the single most recommended security tool across every source I read. It’s a metal bar that wedges under your door handle and braces against the floor. Even if someone has a key or breaks your lock, they cannot push the door open. I slide mine in every night before bed and when I’m home alone during the day. It takes two seconds, and it makes a shocking difference in how safe I feel.
A secondary option: a door jammer wedge for your bedroom door. If someone gets through your front door, your bedroom becomes your safe room with its own reinforcement. Layers matter.
Peephole or video doorbell ($20-50). If your door doesn’t have a peephole, you can install one yourself with a drill and five minutes. If you can’t drill, battery-powered video doorbells stick on with adhesive and connect to your phone so you can see who’s at your door from anywhere. Never open the door without knowing who’s there.
Window pins ($5). If you have sliding windows, drill a small hole through the inner frame where it overlaps the outer frame and insert a nail or pin. The window can’t be opened from outside even if the latch is flipped. Same principle works for sliding glass doors with a cut broomstick or security bar in the track.
Smart light plugs with timers ($15-20 for a 2-pack). Plug a lamp into a smart plug and set it to turn on and off at varied times when you’re out. From the outside, it looks like someone is home and moving around the apartment. Simple, cheap, and effective.
The boots trick. I read this in at least four different Reddit threads and it made me laugh, but people swear by it. Buy a large pair of men’s work boots at a thrift store for a few dollars. Leave them by your front door, visibly dirty and worn. To anyone glancing at your doorstep, it looks like a large man lives there. Silly? Maybe. But burglars make snap judgments based on what they see, and a pair of size 12 boots sends a message.
Medium Investment: $50-200
These are worth considering once you’ve handled the basics above.
Battery-powered security camera ($50-100). No wiring, no drilling, no landlord permission needed. Brands like Blink and Ring make cameras that stick on with magnetic mounts and connect to your phone. You get motion alerts and can check the feed from anywhere. Place one covering your front door. That’s the entry point for the vast majority of break-ins.
Smart lock with auto-lock ($80-150). Replaces your deadbolt. The best feature for solo women: auto-lock after 30 seconds. So even if you forget (and you will sometimes, because you’re human), the door locks itself. Most are renter-friendly, and you can swap your original lock back in when you move out.
Personal alarm keychain ($10-15). A small device on your keychain that emits an extremely loud screech when you pull the pin. Legal everywhere. No training needed. If you’re ever in a situation where you need to attract attention fast, this does it.
Behavioral Habits: Free and More Effective Than Any Gadget
No device replaces good habits. These cost nothing, and they matter more than anything you can buy.
- Lock your door every single time. When you leave. When you come home. When you’re inside for the night. When you step out to grab the mail. Every time. Make it muscle memory so you never have to wonder “did I lock the door?” at 11pm.
- Never open the door without verifying. Use your peephole or camera. If someone claims to be from a utility company or maintenance, call the company or your building management to confirm before opening. It’s okay to make them wait. It’s okay to talk through the closed door.
- Vary your routine slightly. You don’t need to change your entire life. But if you always leave for work at exactly 7:15 and return at exactly 6:30, anyone watching knows when your apartment is empty. Shift it by ten minutes randomly. Take a different exit occasionally.
- The “I’m not alone” fib. When a repair person, delivery driver, or stranger makes conversation, you don’t owe them the truth about your living situation. “My boyfriend is on his way home” or “my roommate is sleeping” is fine. You’re not lying. You’re protecting yourself.
- Don’t broadcast that you live alone online. We’ll go deeper on digital safety in the next section, but the short version: don’t post about being home alone, don’t share your apartment number publicly, and don’t announce when you’re leaving town.
The Move-In Safety Audit
Whether you just moved or you’ve lived in your place for years, run through this checklist once. It takes about 30 minutes, and it closes gaps you might not know exist.
- Change or re-key your locks. You have no idea how many copies of your key the previous tenant made or who they gave them to. Most landlords will re-key if you ask. Some will let you do it yourself.
- Test every window lock. Open and close every window. Make sure each one locks securely. If any are broken, report them to your landlord in writing.
- Check smoke detectors and carbon monoxide detectors. Press the test button on each one. Replace batteries if needed. If they’re missing entirely, your landlord is legally required to provide them in most states.
- Identify all exits. Your front door, any back doors, fire escape routes, stairwell locations. Walk each route once, so it’s not unfamiliar if you need it in the dark.
- Meet at least one neighbor in the first week. You already have the script from Section 2. Use it. One conversation. One phone number. That’s all.
After the audit, you’re done. You don’t need to think about it again unless something changes or you move. But that one pass-through might reveal a window that doesn’t lock, a dead smoke detector, or a fire escape you didn’t even know existed.
Your Digital Safety Matters Too
We spend a lot of time thinking about locks and doors and physical security.
But here’s something I didn’t think about until I started researching this guide: your online presence can tell a stranger that you live alone, where your apartment is, what time you leave for work, and when you’re out of town.
Without you ever meeting them.
That’s not hypothetical. Stalkers, burglars, and scammers routinely use social media and public records to find targets.
And women who live alone are disproportionately affected because the information that makes them vulnerable (solo status, daily patterns, empty apartment windows) is often one careless post away from being public.
This isn’t about being paranoid online. It’s about being intentional.
Lock Down Your Social Media
You don’t need to delete your accounts or stop posting. You just need to close a few doors that you probably don’t realize are open.
- Remove your home address from every public profile. Check Instagram, Facebook, X, LinkedIn, TikTok, and any dating app bios. If your address or even your specific neighborhood is listed publicly, take it off.
- Disable real-time location sharing on posts. Most social platforms let you tag your location when you post. Turn that off as a default. You can always add a location after the fact if you want to. But broadcasting “I’m at this exact coffee shop right now” in real time gives anyone watching a live map of your movements.
- Don’t post vacation photos while you’re still gone. I know this is hard. The sunset is gorgeous, and you want to share it. Save it. Post it when you’re home. An empty apartment advertised on Instagram is an invitation.
- Review your tagged photos and check-ins. Other people tag you in things. Go through your tagged photos and check-ins from the past few months. Do they reveal a pattern? The same gym three times a week? The same bar every Friday? The same walking route? Untag anything that makes you uncomfortable.
Protect Your Accounts
If someone gets into your email, they can get into almost everything else. Your bank. Your utilities. Your medical records. Your Amazon account with your home address saved.
Three things. That’s it. Three things and you’re dramatically safer.
- Use a password manager. 1Password or Bitwarden are both excellent. They generate and store unique passwords for every account so you don’t reuse the same one everywhere. Reusing passwords is the number one way accounts get hacked. A password manager eliminates that entirely.
- Turn on two-factor authentication on every important account. Email, banking, social media, cloud storage. This means even if someone gets your password, they still can’t log in without a code from your phone. Most platforms walk you through setup in their security settings.
- Don’t reuse passwords. I know I just said this. I’m saying it again because it’s that important. If you do nothing else from this section, stop reusing passwords. The password manager makes this effortless.
During a Crisis: Scams Spike
Every major emergency brings a wave of scams. Fake relief funds. Fake government texts asking for personal information. Phishing emails pretending to be FEMA or the Red Cross. Fake charity donation links on social media.
Rules for crisis periods:
- The government will never text or email you asking for money, your Social Security number, or login credentials. If you receive something like this, it’s a scam. Every time.
- Don’t click links in texts or emails from numbers or addresses you don’t recognize, especially ones that create urgency (“claim your emergency relief NOW”).
- Verify any charity before donating. Use sites like Charity Navigator or GuideStar. Or go directly to known organizations like the Red Cross through their official website, not through a link someone shared.
- Misinformation spreads fast during emergencies. If a piece of news sounds extreme or outrageous, verify it through your 2-3 trusted sources from Section 5 before reacting or sharing.
The Google Yourself Test
Here’s a 5-minute exercise that might surprise you. Open a private browser window and Google your full name. Then Google your name plus your city. Then your name plus your phone number.
What can a stranger find out about you?
If you can see your home address, phone number, or personal details on sites like Whitepages, Spokeo, or BeenVerified, you can usually submit a removal request directly on those sites. It takes a few minutes per site and most process removals within a few weeks.
You can’t control everything that’s out there. But you can close the most obvious gaps.
And knowing what’s publicly visible about you is the first step to making informed decisions about what you share going forward.
Managing War Anxiety and the News Spiral
I need to be honest about something.
While I was writing this guide, I had a night where I couldn’t sleep. I’d spent the day reading about nuclear preparedness and fallout shelters and blast radii, and by midnight my brain was completely wired.
I lay in bed staring at the ceiling, running scenarios. What if it happens tonight. What if I don’t have enough water. What if the building collapses. What if nobody finds me.
I’m telling you this because if you’ve felt this way, I want you to know that I have too. And not despite the fact that I’m writing a safety guide. Partly because of it.
War anxiety is not weakness. It is a documented psychological response to sustained exposure to news about conflict, threats, and destruction.
Psychologists describe it as a stress reaction that causes intrusive thoughts, disrupted sleep, hypervigilance, difficulty concentrating, and a persistent sense of helplessness.
It can affect anyone, but research shows that people with pre-existing anxiety, trauma histories, or those who live alone are especially susceptible.
You are not being dramatic. Your nervous system is responding to real signals from the environment.
The problem isn’t that you feel afraid. The problem is when fear stops being useful and starts running your life.
Why Your Brain Gets Hooked on Bad News
Here’s something that helped me understand what was happening to me. Your brain has a built-in threat detection system. It evolved to keep you alive by scanning for danger. And it’s very, very good at its job.
The issue is that your brain can’t tell the difference between a threat that’s happening to you right now and a threat you’re reading about on your phone at 11pm.
It processes both the same way. Heart rate up. Cortisol released. Muscles tense. Ready to run.
So when you doom-scroll through escalating headlines and graphic images for two hours before bed, you’re essentially telling your nervous system that you are in active danger for two straight hours. No wonder you can’t sleep.
Constant news consumption during a crisis doesn’t make you more informed. It makes you less functional.
You feel like you’re doing something productive by staying on top of every update.
But what you’re actually doing is flooding your system with stress hormones that impair your ability to think clearly, make decisions, and take meaningful action.
The most prepared version of you is the one who checks the news deliberately, absorbs what’s relevant, and then closes the app.
My Media Boundaries (Steal Them If They Help)
I tried a bunch of different approaches, and these are the ones that actually stuck for me.
- I check the news twice a day. Once in the morning with coffee, once in the early evening. About 15 minutes each time. That’s it. If something truly urgent happens between those windows, my WEA alert or my safety circle will let me know.
- I unfollowed and muted accounts that spike my anxiety without giving me useful information. You know the ones. The accounts that post dramatic speculation, worst-case-scenario threads, and unverified “breaking” news every twenty minutes. Muted. All of them. I kept my 2-3 trusted sources, and that’s what I check.
- No news in bed. Ever. This is the rule that changed my sleep the most. My phone charges across the room now, not on my nightstand. If I want to read before sleep, it’s a book. A paper one.
- The doom-scroll interrupt. When I catch myself mindlessly refreshing a news feed, I put the phone face-down and ask myself one question: “Is there an action I can take right now?” If yes, I do it. Go check my go bag. Text my safety circle. Refill my water supply. Anything concrete. If no, I close the app. Because if there’s no action to take, consuming more information is just feeding the anxiety without giving it anywhere to go.
Grounding Practices for When the Anxiety Hits Anyway
Even with boundaries, there will be nights when the fear breaks through.
When your chest is tight, and your thoughts are racing, and you’re alone in a quiet apartment with no one to talk you down. Here’s what works.
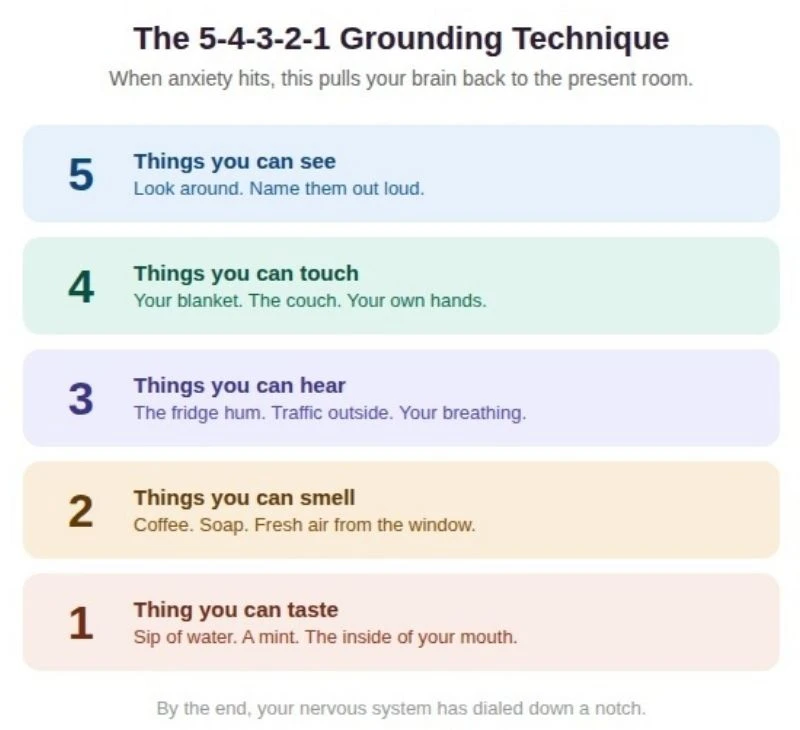
The 5-4-3-2-1 technique. This pulls your brain out of the imagined future and back into the present room.
Name 5 things you can see. 4 things you can touch. 3 things you can hear. 2 things you can smell. 1 thing you can taste.
By the time you finish, your nervous system has usually dialed down a notch because you’ve forced it to engage with what’s actually real and around you right now.
Box breathing. Breathe in for 4 counts. Hold for 4 counts. Breathe out for 4 counts. Hold for 4 counts. Repeat for 2-3 minutes.
This activates your parasympathetic nervous system, which is the part that tells your body “you’re safe, you can stand down.”
It feels overly simple. It works anyway.
Move your body. Even 15 minutes. Walk around the block. Do a YouTube yoga video. Dance to one song in your kitchen.
Physical movement is the fastest non-medical way to break an anxiety loop because it metabolizes the stress hormones your body has been building up.
You can’t think your way out of a stress response, but you can move your way out of one.
Journal with one prompt. Draw a line down the middle of a page. Left side: “What can I control?” Right side: “What is out of my control?” Write whatever comes to mind.
The act of sorting thoughts into these two categories is surprisingly powerful.
It shows your brain that most of the things it’s spinning about belong in the right column, and the things in the left column already have a plan.
When It’s More Than Normal Anxiety
There’s a difference between being worried during worrying times and being unable to function. Both are valid. But the second one needs more support than a grounding exercise.
Talk to someone if you’re experiencing any of these for more than a couple of weeks:
- You can’t fall asleep or stay asleep most nights
- You can’t concentrate at work or on basic daily tasks
- You’re withdrawing from all social contact, even people you usually enjoy
- You’re crying daily or having frequent panic attacks
- You’ve stopped eating regularly or are eating compulsively
- You feel a persistent sense of dread that doesn’t lift even during good moments
These are signs that your nervous system is stuck in a threat response and needs professional help to reset. That’s not failure. That’s biology.
Where to get help:
- 988 Suicide & Crisis Lifeline: Call or text 988, available 24/7
- SAMHSA Disaster Distress Helpline: 1-800-985-5990, specifically designed for emotional distress related to disasters and crisis events
- BetterHelp or Talkspace for online therapy if in-person feels like too much right now
- Your insurance provider’s directory for in-network therapists, many of whom offer telehealth
- Open Path Collective for sliding-scale therapy ($30-80 per session) if cost is a barrier
The Reframe That Changed Everything for Me
Here’s the thing I didn’t expect when I started this project.
Building my safety plan actually reduced my anxiety more than any coping technique did.
Not because the threats went away. They didn’t.
But because my brain finally had an answer to the question it kept asking at 2am. “What would I do if…?” I know what I’d do. I wrote it down. My bag is packed. My people know the plan. My documents are ready. My alerts are set.
When your brain asks the scary question, and there’s an actual answer waiting, it doesn’t need to keep asking.
Preparedness isn’t the opposite of anxiety. It’s the cure for the kind of anxiety that comes from feeling unprepared. You can’t control what happens in the world. But you’ve now built something real and concrete for the part of the world you can control. That matters. Hold onto that.
Level Up: Skills That Make You Harder to Rattle
Everything in this guide so far is about planning and preparation. This section is about building yourself into someone who feels genuinely capable, not just theoretically prepared.
Plans are great. Skills are better. Because skills travel with you everywhere and nobody can take them away.
CERT Training (Community Emergency Response Team)
This is the single best thing I did for my confidence as a woman who lives alone. And almost nobody knows it exists.
CERT is a free, FEMA-backed training program that teaches civilians how to respond during emergencies.
It covers disaster preparedness, basic fire safety, light search and rescue, disaster medical operations, and team organization. The full course is about 18-21 hours, usually spread over several weekends.
It’s taught by local fire department and emergency management professionals. And it’s available in communities across the entire United States.
Why it’s perfect for solo women: You walk out with real, hands-on skills that most people don’t have. You know how to triage injuries. You know how to safely shut off a gas line. You know how to assess a building for structural damage. And maybe more importantly, you walk out with a room full of safety-minded people who live near you. Phone numbers get exchanged. Relationships form naturally.
I was the youngest person in my CERT class and the only one who lived alone.
By the last session, I had four new phone numbers in my contacts and a neighbor who’s now one of my primary emergency contacts.
That happened without me trying. It just comes with the territory when you spend 20 hours learning to help each other.
How to find your local program: Go to community.fema.gov/PreparednessCommunity/s/cert and search by your zip code.
If there isn’t a program near you right now, you can sign up to be notified when the next one opens.
Basic First Aid and CPR
The Red Cross offers first aid and CPR/AED classes in nearly every city. They typically cost $30-90 and take a few hours. Some employers will reimburse or cover the cost.
For someone who lives alone, the most valuable thing first aid training gives you is judgment. Knowing the difference between “this is scary, but I can handle it” and “I need to call 911 right now.”
When you live alone, there’s no one else to make that call for you. Training gives you the framework to make it for yourself.
Even if you never use these skills on someone else, you might need them for yourself.
Knowing how to stop bleeding, treat a burn, recognize the signs of a heart attack or stroke, or manage a severe allergic reaction could save your own life while you wait for help.
Self-Defense Basics
I want to be clear about what I mean by this.
I’m not suggesting you become a martial arts expert or start carrying weapons. What I am suggesting is that you learn the basics of awareness, boundary-setting, and creating distance.
Many community centers, YWCAs, and local police departments offer free or low-cost women’s self-defense workshops.
They typically run 2-4 hours and cover situational awareness (reading your environment, trusting your instincts), verbal boundary-setting (commanding voice, clear directives), and a few physical techniques for breaking grabs and creating space to escape.
The goal isn’t to win a fight. The goal is to not be in one. And if you can’t avoid it, the goal is to create enough distance to get away.
Your 12-Month Safety Upgrade Calendar
If this guide feels like a lot, here’s the gentlest possible way to do all of it.
One thing per month. In a year, you’re fully prepared. No rush. No overwhelm. Just steady progress.
- Month 1: Build your micro kit and your safety circle (Sections 2 and 4)
- Month 2: Set up all your alerts and write your emergency plan (Sections 3 and 5)
- Month 3: Build your go bag (Section 4)
- Month 4: Do your home security audit (Section 7)
- Month 5: Do your digital security sweep and the Google Yourself test (Section 8)
- Month 6: Take a first aid or CPR class
- Month 7: Build your home kit for 7+ days of sheltering (Section 4)
- Month 8: Sign up for CERT training
- Month 9: Practice your evacuation route. Time it. Drive the backup route once.
- Month 10: Review and update everything. Refresh expired supplies. Update contact info.
- Month 11: Financial preparedness check. Review your emergency fund, renter’s or homeowner’s insurance, and document kit.
- Month 12: Share what you’ve learned. Send this guide to another woman who lives alone. Help her get started.
Print this. Stick it on your fridge. Check off each month.
In 12 months, you’ll be more prepared than 95% of the population. And you’ll have done it without ever feeling overwhelmed.
Free Printable
12-Month Safety Upgrade Calendar
One task per month. Print it. Stick it on the fridge.
In a year, you’re fully prepared.
No email required. Just click and save.
You’re Not Alone in This
I want to take you back to where this all started.
A woman in California posted on Reddit that she was scared. She lived alone. The news had her spiraling. She didn’t know what to do.
Over 200 people upvoted her post. 125 left comments. Some shared practical tips. Some shared their own fear. Some just said “I feel this too.”
She posted because she felt alone. And hundreds of people showed up to say she wasn’t.
That’s the thing about living solo.
It’s easy to believe that because you’re physically alone in your apartment, you’re alone in the experience. You’re not. Millions of women in this country live alone.
And most of them have felt exactly what you’ve felt while reading this guide. The fear. The uncertainty. The late-night spiral where your brain won’t stop asking “but what if.”
The difference now is that you have an answer.
You have a safety circle that knows your plan. You have a written emergency strategy tailored to your life. You have kits that are packed, alerts that are set, and a home that’s more secure than it was an hour ago. You understand what to do during a real emergency. You know how to protect yourself online. And you have tools to manage the anxiety that comes with living through uncertain times.
You did that. On your own. Because that’s what women who live alone do. They figure it out, they build it themselves, and they keep going.
This guide will always be here. Bookmark it. Come back when you need to update your plan or when a new situation makes you want to review the playbooks.
And if you found it helpful, share it with another woman who lives alone. She’s probably sitting on her couch right now with her phone in her hand, feeling exactly the way you felt before you started reading.
One last thing. If this content felt heavy, please step away and do something that feels good.
Make tea. Call a friend. Take a walk. Watch something that makes you laugh. Taking care of your emotional well-being is not separate from being prepared. It is being prepared.
You’ve got this. For real.
If you or someone you know is struggling with anxiety, crisis, or emotional distress:
- 988 Suicide & Crisis Lifeline: Call or text 988 (available 24/7)
- SAMHSA Disaster Distress Helpline: 1-800-985-5990 (for emotional distress related to disasters and crisis events)
- Crisis Text Line: Text HOME to 741741
FAQs
How can a woman living alone protect herself during an emergency?
Build a safety circle of 2-3 trusted people before an emergency happens, create a written plan with shelter-in-place and evacuation steps, pack a go bag with 72 hours of supplies, and enable Wireless Emergency Alerts on your phone. Having a system in place means you follow a plan instead of panicking.
What should a single woman have in an emergency kit?
Water (one gallon per day for 3 days), non-perishable food, a flashlight, batteries, a battery-powered NOAA radio, a first aid kit, copies of important documents, $200+ in cash, prescription medications, and a phone charger. Women should also add menstrual products, extra underwear, hair ties, and a personal safety alarm.
Is it safe for a woman to live alone in a city?
Yes, with basic precautions. A door security bar ($15-20) is the single most effective upgrade. Add a peephole or video doorbell, window pins, smart lights on timers, and a check-in system with a trusted neighbor or friend. Millions of women live safely alone in U.S. cities using these simple measures.
How do I deal with anxiety about living alone?
Take concrete action on your safety first: build an emergency plan and set up basic home security. Anxiety feeds on uncertainty, and having an actual plan quiets the “what if” spiral. Then set media boundaries: limit news to twice a day, 15 minutes each, and never check the news in bed.
What should I do during a power outage if I live alone?
Charge your devices immediately, fill your bathtub with water for flushing, and use flashlights instead of candles (fire risk is higher when no one else can notice a tipped candle). Keep the fridge closed (stays safe about 4 hours). Conserve phone battery aggressively and stay inside after dark during extended outages.
How do I make an emergency plan if I live alone and have no family nearby?
Build your plan around proximity, not blood relationships. You need a local friend within 20 minutes you can evacuate to, a neighbor who has your phone number, and one out-of-state contact to relay messages when local lines jam. Write down your shelter room, evacuation route, and contact sequence, then share it with all three people.
What is a go bag and what should be in one?
A go bag is a pre-packed backpack by your front door containing everything you need to survive 72 hours away from home. Essentials include water, food, flashlight, radio, first aid kit, document copies, cash, phone charger, medications, and a change of clothes. A properly packed go bag weighs about 10-12 pounds.
How do I cope with war anxiety when I live alone?
Limit news consumption to twice a day from 2-3 trusted sources, never before bed. Practice grounding techniques like the 5-4-3-2-1 method or box breathing when anxiety spikes. Move your body for at least 15 minutes daily. If anxiety disrupts your sleep or daily functioning for more than two weeks, call the SAMHSA Disaster Distress Helpline at 1-800-985-5990.
What security devices does a woman living alone actually need?
A door security bar ($15-25), a peephole or battery-powered video doorbell ($20-50), window pins for sliding windows ($5), and smart light plugs with timers ($15-20). All are renter-friendly and require no drilling. If budget allows, add a battery-powered security camera ($50-100) and a personal alarm keychain ($10-15).
How often should I update my emergency supplies?
Twice a year. An easy reminder is to check your kit when the clocks change for daylight saving time. Replace expired food, water, and medications. Test flashlight and radio batteries. Verify your emergency contacts are still current. The whole process takes about 20 minutes.